You need a photo with the background gone — for a product listing, a thumbnail, a profile picture, a design. The two apps everyone reaches for are GIMP (free, powerful, manual) and Canva (easy, one click, paywalled). This guide walks through every reliable background-removal method in both, honestly flags where each one costs you time or money, and finishes with the one-click route that costs neither.
The Quick Answer (Cheat Sheet)
GIMP, plain background: Layer → Transparency → Add Alpha Channel, press U (Fuzzy Select), click the background, press Delete, export as PNG.
GIMP, white logo background: Colors → Color to Alpha → pick white. Done in one dialog.
Canva: select the photo → Edit photo → BG Remover — one click, but it requires a paid Canva Pro plan.
Free and instant: the PursTech Background Remover — AI removal that runs in your browser in seconds, no signup, and your photo never leaves your device.
How to Remove a Background in GIMP
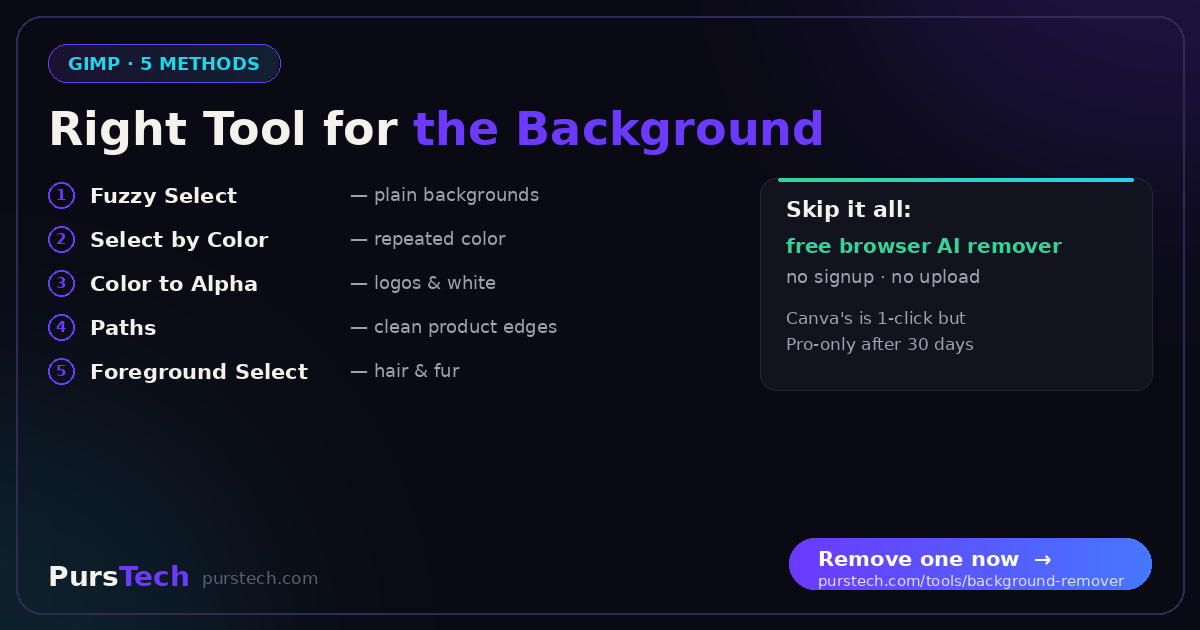
GIMP gives you five real methods. Which one to use depends entirely on what is behind your subject — pick from the table of situations below and jump in. One rule applies to all of them: add an alpha channel first. Go to Layer → Transparency → Add Alpha Channel. If you skip this, GIMP fills every "deleted" area with a solid color instead of transparency — the single most common reason background removal fails in GIMP.
Method 1 — Fuzzy Select: plain or solid backgrounds
This is GIMP's magic wand, and it is the right tool when the background is one roughly even color.
1. Press U to activate Fuzzy Select (or pick it in the toolbox).
2. Click anywhere on the background. Marching ants surround the selected region.
3. Too little selected? Raise the Threshold slider in Tool Options (15–50 covers most photos) and click again. Grabbed part of your subject? Lower it. Hold Shift and click to add extra background patches to the selection.
4. Soften the edge so the cut-out does not look pasted on: Select → Feather, 1–2 pixels.
5. Press Delete. The checkerboard pattern that appears is transparency.
Method 2 — Select by Color: same color in many places
If the background color also shows through gaps — between an arm and a body, inside a mug handle — Fuzzy Select would need a dozen clicks. Select → By Color (Shift+O) selects every pixel of that color across the whole image at once. Click the background color, then feather and delete exactly as above.
Method 3 — Color to Alpha: logos and white backgrounds
The fastest GIMP method of all, ideal for logos, signatures and scans on white. Go to Colors → Color to Alpha, make sure the color box is set to white (or click it and pick the exact background shade), and press OK. GIMP converts that color to transparency everywhere in one pass. One caveat: it also turns that color transparent inside your subject — a white shirt will go see-through — so keep it for graphics rather than photos of people.
Method 4 — Paths: product shots that need clean edges
When the background is busy and the subject has defined edges — a shoe, a bottle, a chair — nothing beats tracing it. Press B for the Paths tool and click anchor points around the subject; click your first point again to close the loop. Convert the path to a selection with Select → From Path, then flip it so the background is selected instead: Select → Invert (Ctrl+I). Feather 1–2 px and press Delete. Slow, but this is how crisp e-commerce cut-outs are made by hand.
Method 5 — Foreground Select: hair and fur
For people and pets, use the Foreground Select tool. Trace a rough outline around the subject, then paint a few strokes over the areas that are definitely subject — GIMP analyses the colors and finds the real edge, including strands of hair. Toggle the preview to check it, confirm the selection, then Select → Invert and Delete. Results vary with contrast: great on a blonde head against a dark wall, frustrating on brown hair against brown wood. When it fights you, this is exactly the job AI removers were built for.
Saving it: export as PNG, never JPEG
GIMP's own format is .xcf, so use File → Export As and type a filename ending in .png. JPEG cannot store transparency — export one and your careful cut-out comes back on a flat white background. If the file needs to be small too, run the PNG through an image compressor afterwards.
How to Remove a Background in Canva
Canva's version is genuinely one click — with one catch.
1. Upload your photo and add it to the canvas.
2. Click the photo, then click Edit photo in the toolbar.
3. Choose BG Remover. Canva's AI erases the background in a few seconds, and you can brush areas back in with Restore or wipe more with Erase.
The catch: it is a Canva Pro feature. On a free account the BG Remover button carries a lock or crown icon and tapping it opens an upgrade prompt. It is included in Pro, Teams and Education plans, and Canva runs a 30-day Pro trial — but on the permanent free tier there is no built-in way to remove a background. If Canva is where you design but you do not want to pay, the practical workflow is: remove the background with a free tool first, then upload the transparent PNG into Canva.
The 1-Click Way That Stays Free
The PursTech Background Remover gives you the Canva-style experience without the subscription: drop an image in, the AI finds the subject, and you download a transparent PNG seconds later. Three things make it different from most "free" removers:
It runs in your browser. The AI model executes on your own device — the photo is never uploaded to a server, which matters for client work, ID photos and anything private.
It is actually free. No signup, no watermark, no daily limit, no resolution paywall.
It handles the hard cases. Hair, fur and soft edges — the ones that make GIMP's manual tools tedious — are exactly what the model was trained on.
A sensible split: use the AI remover for photos of people, pets and anything organic; use GIMP's Paths tool when you want obsessive manual control over a product edge; use Color to Alpha for logos. After removing, you can resize the PNG to exact dimensions for wherever it is headed.
What About Photoroom, Pixlr and Picsart?
All three can remove backgrounds and all three follow the same freemium pattern: the remover works, but free exports come with limits — watermarks, reduced resolution, daily caps or a required account — and the full feature sits in the paid tier. They are solid apps if you already subscribe. If you only need the background gone, a genuinely free browser tool does the same job without the meter running.
Which Should You Use?
Choose GIMP when you want full manual control, you are comfortable with a learning curve, and the job involves precise product edges or logo cleanup. Cost: free forever. Time: 2–15 minutes per image.
Choose Canva when you already pay for Pro and the photo is going straight into a Canva design anyway. Cost: Pro subscription. Time: seconds.
Choose a free browser AI remover for everything else — which, honestly, is most background-removal jobs. Cost: nothing. Time: seconds. Privacy: the image stays on your device.